How to Design a Septic Tank System: Complete Guide for Efficient Wastewater Management
Designing a septic tank system is a critical step in managing household wastewater, especially in areas where centralized sewage treatment infrastructure is unavailable. Whether you’re planning a new construction project, upgrading an existing setup, or building in a rural area, a well-designed septic tank ensures efficient, long-term sewage treatment with minimal environmental impact.
In this detailed guide, we will walk you through everything you need to know about how to design a septic tank, from planning and sizing to installation and maintenance—supported by the industry experts at 3D AQUA, India’s leading wastewater treatment solutions provider.
📌 What is a Septic Tank and Why Does Design Matter?
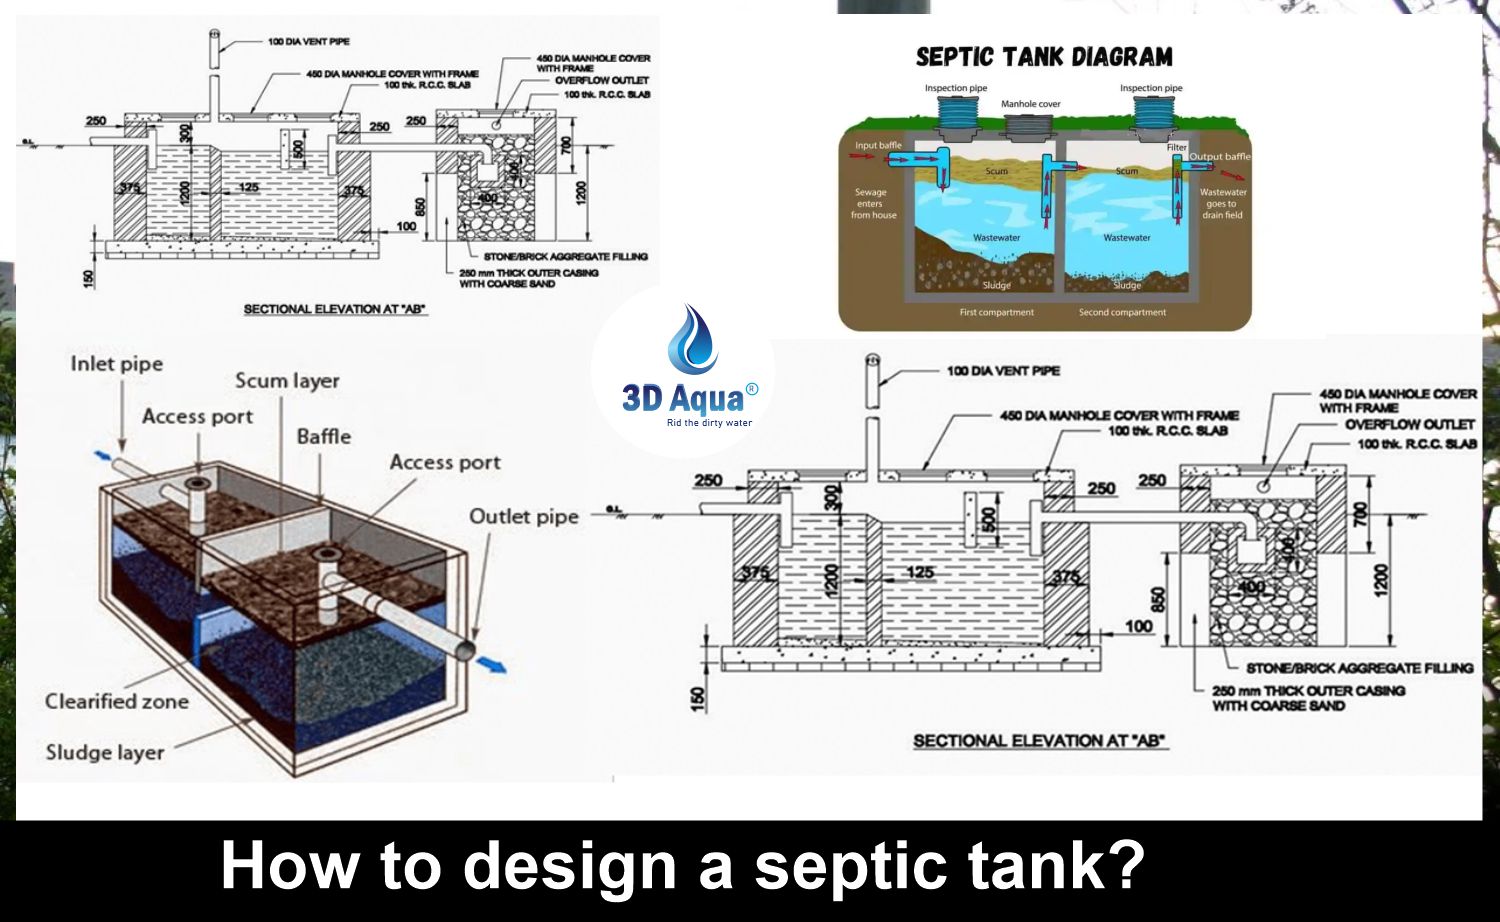
A septic tank is a watertight underground container used to collect and treat sewage and wastewater from homes and buildings. It separates solids from liquids, allowing the clear effluent to be gradually absorbed into the soil through a drain field or leach field.
Poorly designed septic tanks can lead to:
- Blockages and overflows
- Soil and groundwater contamination
- Foul odours and health risks
- Costly repairs and replacements
Thus, investing time in correct septic tank design saves money and ensures long-term performance.
🧾 Key Considerations Before Designing a Septic Tank
Before diving into the design phase, conduct a thorough site survey and understand the specific requirements of your property. Here’s what to consider:
✅ 1. Site Survey and Soil Testing
- Percolation Test (Perc Test): This test measures how quickly soil absorbs water and determines the feasibility of a drain field.
- Soil Type: Clayey soils have poor absorption, whereas sandy soils may allow untreated water to pass too quickly. Ideal soil has moderate permeability.
- Water Table Level: A high water table may require elevated systems or alternative treatment methods.
- Topography: Slopes and land contours affect drainage design.
✅ 2. Expected Sewage Load
Estimate the amount of wastewater generated based on:
- Number of current and potential residents
- Household size and lifestyle
- Water usage habits (e.g., high water-consuming appliances)
Tip: Always plan for future expansion to avoid system overload.
✅ 3. Regulatory Compliance
Consult local municipal or environmental authorities for:
- Required setbacks from buildings, wells, and water bodies
- Minimum tank capacities
- Construction codes and permits
- Discharge standards
📏 How to Calculate Septic Tank Size
Septic tanks are typically sized based on daily sewage flow and number of users. Here’s a rough guideline:
| No. of People | Minimum Tank Capacity (Litres) |
|---|---|
| 2–4 | 2,000–2,500 |
| 5–6 | 3,000–3,500 |
| 7–10 | 4,000–5,000 |
Formula for Tank Volume (approximate):
Volume=Number of People×150–200 Litres/day/person×Retention Time (in days)
Retention Time typically ranges from 24 to 48 hours depending on design.
🛠️ Septic Tank Installation Process: Step-by-Step Guide
Now let’s break down the actual installation process of the septic tank system:
1. Inspect the Tank Before Installation
- Check for cracks, holes, or manufacturing defects
- Make sure the tank’s inlet and outlet ports are intact
- Inspect during delivery—most manufacturers won’t accept damage claims after installation
2. Verify Invert Level (Inlet Depth)
The invert level refers to the depth of the inlet pipe from ground level. It must match the planned plumbing system. Reconfirm:
- The elevation of the inflow pipe from the building
- Whether the tank can align properly without excess excavation
3. Select a Suitable Installation Location
The installation site must meet the following conditions:
- At least 5–10 meters away from water sources like wells or ponds
- Easy accessibility for maintenance or desludging
- Away from high-traffic areas (unless structurally reinforced)
- Sufficient space for both tank and drain field
Refer to the manufacturer’s site plan guide and local codes before digging.
4. Excavate the Hole for the Tank
- Dig a hole large enough to accommodate the tank and backfill material
- Allow for at least 300mm clearance around the tank
- Level the base using concrete bedding (usually 100mm thick)
5. Confirm Drainage Gradient
The slope of drainage pipes ensures natural flow by gravity:
- Between house and tank: 1 in 60 or 1 in 70
- Between tank and drain field: Maximum 1 in 200
Incorrect gradient can lead to backflow or sluggish movement.
6. Lower the Tank Safely
Use approved lifting methods (e.g., crane or lifting hooks) to:
- Prevent damage or misalignment
- Keep the tank level during placement
- Ensure correct orientation of inlet and outlet
7. Backfill the Tank Properly
Use suitable materials like:
- Concrete (for high water tables or structural needs)
- Gravel
- Sand
Compact in layers and avoid debris or large stones to prevent damage. Follow the manufacturer’s recommendations strictly.
8. Install Inlet and Outlet Connections
Once the tank is in place:
- Connect the inflow pipe from the building
- Connect the outflow pipe to the drain field
- Use watertight seals or rubber gaskets to prevent leakage
If unsure, consult a licensed plumber for proper fittings.
9. Design and Install the Drain Field
A typical drain field consists of:
- Perforated pipes laid in gravel-filled trenches
- Distribution box to evenly spread effluent
- Ventilation to allow air flow and prevent anaerobic conditions
The size depends on:
- Percolation test results
- Sewage volume
- Soil absorption rate
Drain fields are usually installed under lawns or soft landscaped areas for easy filtration.
10. Install Cover and Frame
- All septic tanks must be covered securely
- Use non-traffic-rated covers unless installed under driveways or parking zones
- For traffic areas, consult a structural engineer for reinforced design
11. Ensure Proper Ventilation
Often overlooked, ventilation is critical to prevent the buildup of gases like methane and hydrogen sulfide. Proper venting also eliminates foul odours.
- Include vertical vent pipes from the tank or connected pipelines
- Install air admittance valves if necessary
🛡️ Tips for Long-Term Operation and Maintenance
- Regular desludging: Every 2–3 years for most households
- Avoid chemical cleaners: They kill beneficial bacteria
- Do not flush plastics or sanitary waste
- Inspect for leaks or cracks periodically
- Keep records of maintenance and inspections
👷 Why Choose 3D AQUA for Your Septic Tank and Wastewater Needs?
3D AQUA is a trusted name in India’s wastewater treatment industry. Based in Greater Noida, we offer expert solutions for residential, commercial, and industrial sectors.
🔧 Our Specializations Include:
- Septic Tank Systems
- Sewage Treatment Plants (STPs)
- Effluent Treatment Plants (ETPs)
- Commercial & Industrial RO Plants
- Water Softener Plants
- Zero Liquid Discharge (ZLD) Solutions
⭐ What Makes Us #1?
- ✔ ISO & CE-Certified Manufacturing Units
- ✔ 1050+ Cities & 9 Countries Served
- ✔ Custom Solutions Based on Site Conditions
- ✔ 24×7 Technical Support
- ✔ Unmatched Quality and Client Satisfaction
📞 Contact Us Today
Looking for a reliable septic tank design and installation partner?
Reach out to 3D AQUA for site surveys, design consultancy, product selection, and turnkey implementation.
📍 Greater Noida
📞 Call: +91-6262629090
📧 Email: info@3daqua.in
🌐 Website: www.3daqua.in
🧾 Conclusion
A properly designed and installed septic tank ensures safe and efficient treatment of household wastewater. From site assessment and tank sizing to system installation and long-term maintenance, each step plays a vital role in the success of your septic solution.
Choosing expert partners like 3D AQUA not only ensures compliance and reliability but also peace of mind for years to come.
Let’s build a cleaner, healthier future—one septic tank at a time.
Read Also: Expert Febrication of All Type of Waste Water Tanks